How do I build a PC step by step?
The first time you build a PC from scratch is an exciting learning experience. I’ve tried to make these instructions as detailed as possible and hope that you will find them useful.
The parts used in this build can be found in the Skylake PC for under $1000 post along with real time prices. So what are you waiting for, roll up your sleeves and let’s get going…
Step 1: Prep your work area
Before you begin clear an area where you can work and setup your anti-static kit. I’ve mentioned this in previous posts because it’s better to be safe than to be sorry. The last thing you want is to spend lots of time and money on your custom build only to find you’ve fried the motherboard with static electricity.
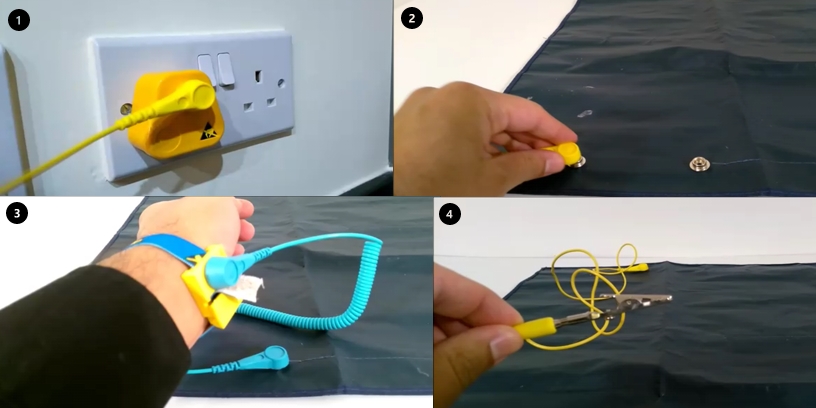
I used my anti-static kit which includes a mat, wrist strap and additional cable.
- The grounding plug is plugged into a power outlet. - The other end plugs into the anti-static mat where I’ll be working. - The wrist strap plugs into the mat as well to ground me. - The additional cable is can be used to ground the case.You’ll need a Philips and flat screwdriver for the assembly or you can get a cool kit like this one.
Step 2: Install the CPU and Heatsink
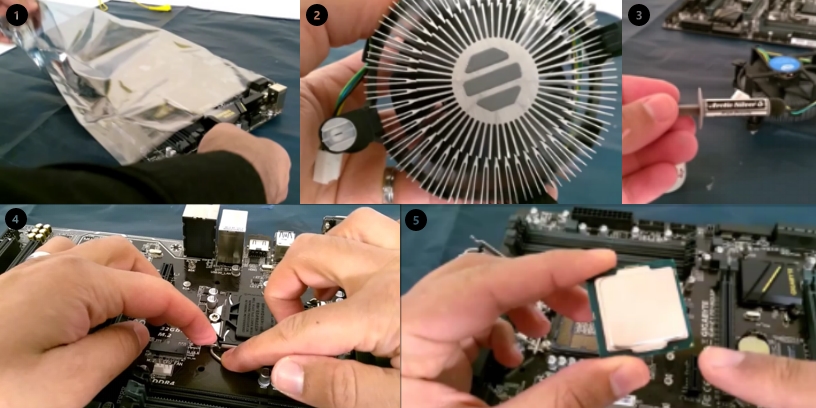
- Remove the motherboard from the anti-static bag and place it on the mat.
- Remove the CPU and heatsink from its packaging. Be careful with the heatsink as it has pre-applied thermal paste on the underside (this is used to efficiently remove heat from the CPU).
- If you are re-using a heatsink or CPU, you will need to buy some thermal paste and cleaning solution. Use the solution to clean the paste off the CPU and heatsink, when re-applying two small lines of paste should be enough.
- Press the CPU latch down to release and raise the mechanism up. At this stage don’t remove the protective plastic cover.
- The motherboard and CPU both have a triangle indicator to show you the correct way to install the CPU (there are also two notches to prevent any mistakes).

- Gently place the CPU into position and try moving it slightly from side to side. You should be able to tell that the pins are in place.
- Bring the CPU mechanism down again and as you push the arm down the plastic cover will come lose – now you can remove it (the unnerving creaking sound is normal!).
- Lock the arm in place. The CPU is now correctly installed.
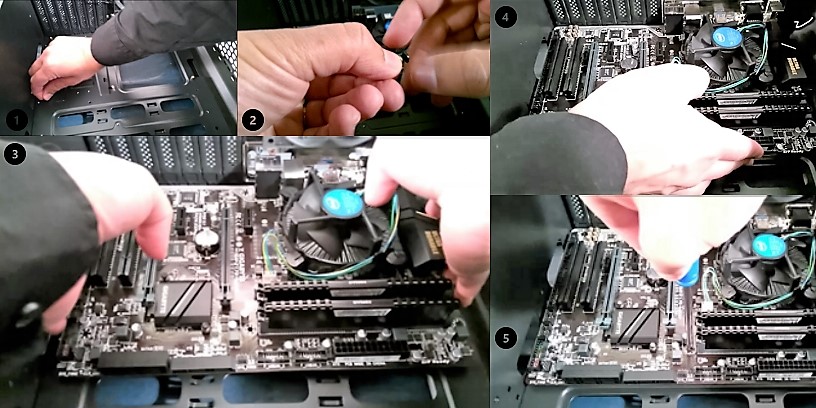
- The heatsink has four spring loaded screws that are inserted into the motherboard’s four holes by pushing down and locking the screws in the direction shown on the screws themselves.
- You might not get this bit right first time so make sure to check that the heatsink is secured into place. The thermal paste will have spread on top of the CPU and a well fitted processor will ensure correct CPU heat dissipation.
- Unwind the fan cable and insert it into the CPU FAN connector on the motherboard, making sure the cable does not obstruct the fan (these connectors are fool-proof and cannot be plugged in the wrong way around).
Step 3: Install the Memory (RAM)
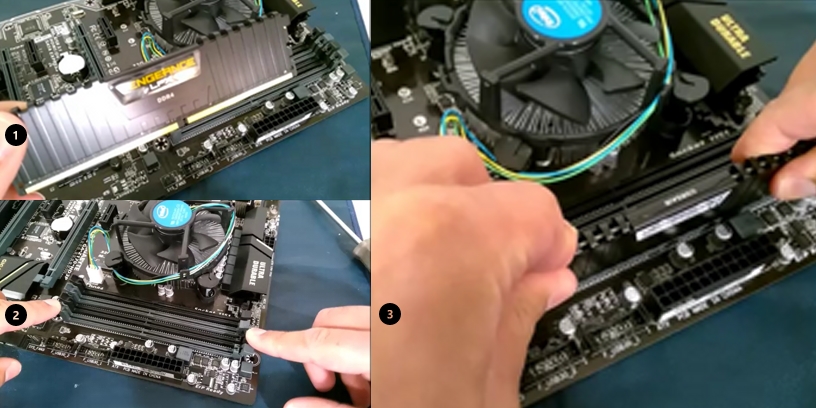
- Memory works in dual channel mode and you will need to take a quick look at the motherboards manual to check which DIMM slot combination to use. On my motherboard this was DIMM 1 and 2 which is clearly labelled on the board itself.
- Open the latches on the DIMM slots and line up the notches on the RAM. This is important because although they can only be fitted in one direction, you could still do damage by forcing them into the wrong way.
- Once the notches are aligned, push the RAM in until it clicks into place (the click is the sound of the latches securing into place).
Step 4: Prepare the case and install the Motherboard
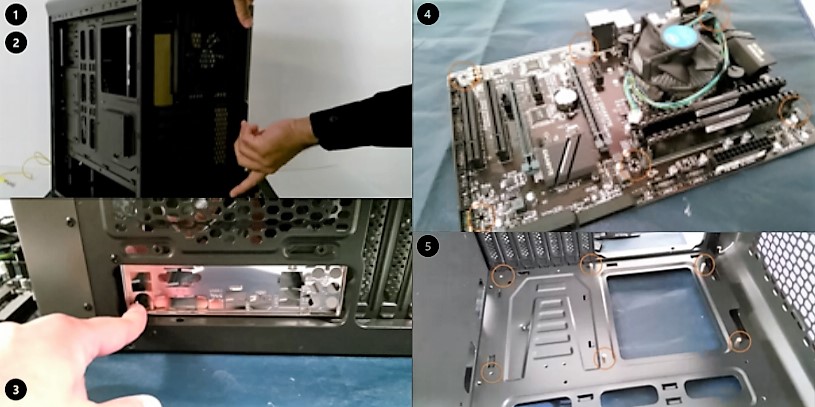
- Place the case on the anti-static mat and take the side panels off by removing the screws from the back.
- Remove any accessories in the case and move the front panel and fan cables out of the way. It’s easier to build in the case on its side, so place it on its side so you’re standing over it and looking in.
- Before fitting the motherboard, don’t forget to insert the backplate, this simply pushes into place.
- The motherboard will have several holes in it where it attaches to the case, identify where they are on your motherboard.
- Now check which way the motherboard is designed to sit in your case. The I/O ports are a good indicator but if you’re still having trouble, check the case manual.
- The motherboard is secured to the case using standoffs, some of which may already be fitted in the case. Hand tighten the standoffs into place making sure not to overtighten them.
- There will be an assortment of screws that came with the case. Some of these may look the same but have slightly different thicknesses. Test a screw on a spare standoff to figure out whether it’s the right one.
- Carefully lower the motherboard into place pushing the I/O ports towards and into the backplate holes (this is easier with bigger cases).
- Once in place the motherboard holes should align to the standoff holes, if not you may need to do a bit of pushing and pulling.
- Half screw in all the motherboard screws and fully tighten them when the motherboard is correctly in place. Cheaper or low quality cases tend not to always line up properly and sometimes it’s a matter of brute force to get the holes to match up.
Step 5: Plug in the front panel cables and fan(s)
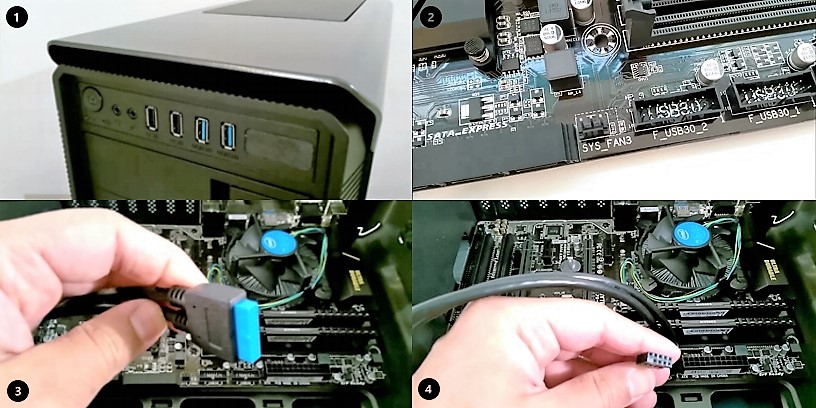
- The front panel cables are for the USB ports, the power buttons, audio ports and any other ports on the front of the case.
- If you’re not sure which cables are which, you should look in the manual that came with the case or the labels next to the connectors on the motherboard itself.
- I started with the USB 3.0 connector which plugs into the USB 3.0 header on the motherboard. Like the other cables, the notches prevent any mistakes when plugging it in.
- Next was the USB 2.0 and audio connections, this time the blocked out pin on the connector prevents any mistakes.
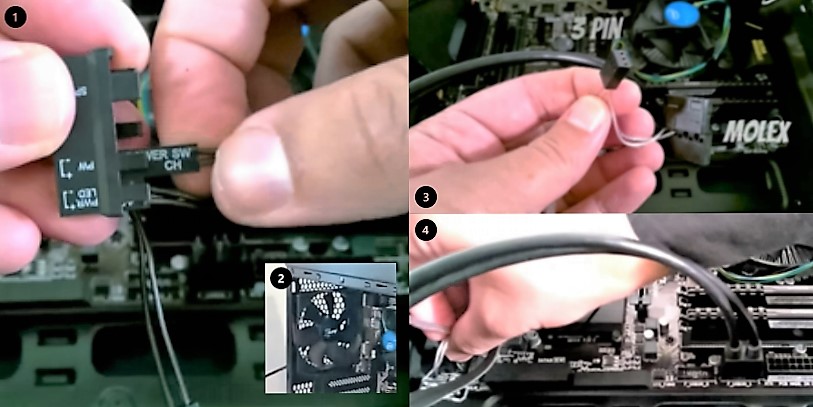
- The cables that control things like the power and hard drive lights are small connectors that can be a bit fiddly. The useful little adapter that came with my Gigabyte motherboard made this somewhat easier. I simply had to match the + and – connectors and then insert the adapter into the motherboard header. It’s a good idea to double check the motherboard manual to make sure you plug these cables into the right pins.
- If you brought separate fans remove the ones that came with the case and attach the ones you brought. Pay attention to which way around you attach them (the logo side usually intakes air).
- These fans will have 3 or 4 pin plugs or even the older Molex plugs. Molex plugs go straight into the power supply and the fan remains on full spin all the time. The 3 and 4 pin cables plug directly into the motherboard and are controlled by the BIOS. These fans slow down when needed and so are likely to last longer.
- Don’t worry if your motherboard only has 4 pin connectors the 3 pin plugs can still be used in them.
Step 6: Install the Power Supply (PSU) and test power on
- In my case the PSU is separated off from the motherboard and tidying up the cables is a lot easier. For the moment though we just want to test that the main components (CPU, motherboard and memory) power up and work correctly, so don’t worry about the cabling mess.
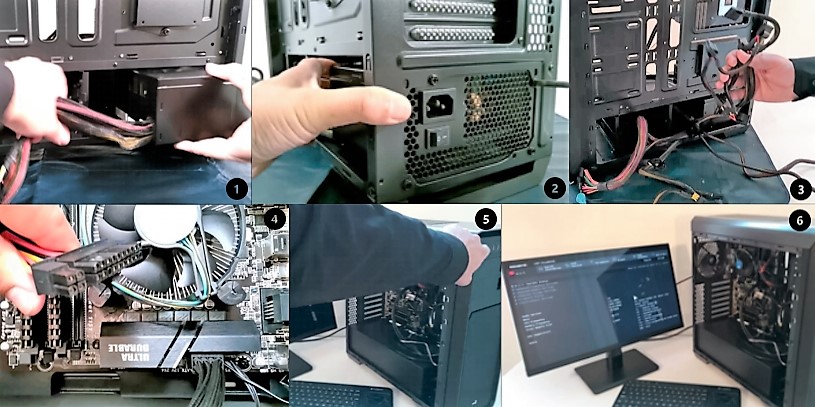
- The PSU slides into place and is secured with 4 screws to the case.
- Now separate and identify the different power connector cables from the PSU.
- Plug in the 8 pin motherboard power cable and then the 24 pin one.
- It’s now time to test if everything powers on! Connect your monitor, keyboard/mouse and power cable. Press the power button and hold your breath…
- Ok, you don’t really have to hold your breath! If everything went well, you will either get the BIOS screen or something like no operating system found or no hard drive installed’.
- Turn the PC off, unplug the monitor and peripherals and do a little dance – your custom build works!
Step 7: Install the Drives and tidy up the cabling
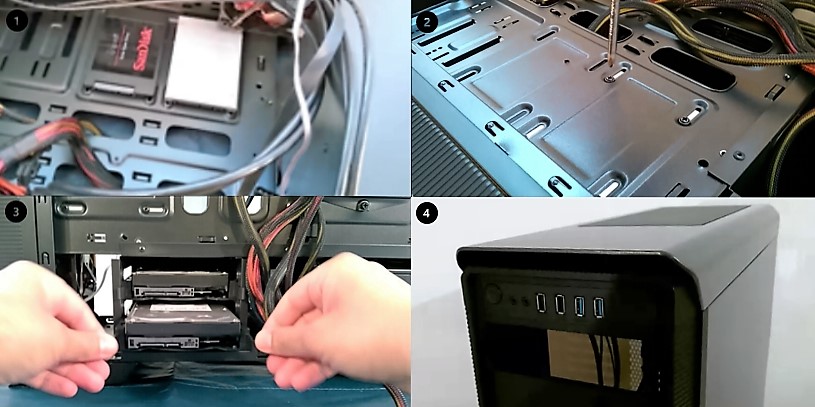
- My case has a combination of tool-less drive bays and areas on the case where drives are attached.
- The two SSD’s were screwed onto the case by turning the case upside down and holding the drives in position with my other hand from underneath.
- The SATA drives were inserted into the tool-less drive caddies and slid into positon.
- If I were using an optical drive this would have been installed by removing the front placeholder cover and sliding the drive into place. Two screws would have secured it into place from either side.
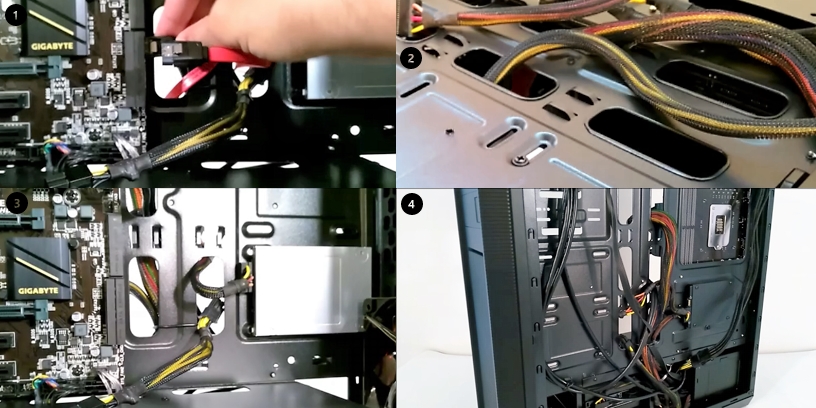
- Now plug in the SATA data cables that came with the motherboard and the power cables from the PSU to your drives.
- At this point it’s time to think about cable management, after all you want the inside of your PC looking neat don’t you? Tidying up the spaghetti of cables should be a mandatory task since you want air to flow in your case properly.
- Getting these cables out of the way will differ depending on your case but most cases will include hooks to attach cables to or holes to channel cables through. Hopefully your case will also include cable ties to keep those pesky cables in place. Personally I prefer the twist ties that come with most product packaging.
- Firstly, unplug any cables that can be fed through a better route in the case and secondly make sure all the cables reach the components that they need to get to. For this build I found that the SATA cable wouldn’t reach the second SSD drive and so I had to move it to the drive bay on the back of the case. The 24 pin motherboard cable was too short as well and so I used an extension cable that I already had.
Step 8: Install the Graphics card and any other PCI cards
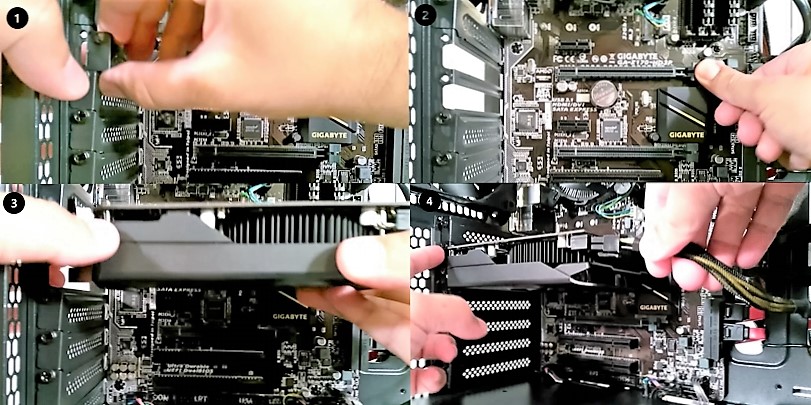
- Remove the expansion slot cover plate by taking out the screw on the top. My graphics card uses 2 spaces so I took out 2 plates.
- Flip the latch down like you did with the DIMM slots ready to slot the card in.
- Slot the card in, secure the latch and put the screw back in.
- If your card needs power choose the right connector from the PSU and plug it in. My graphics card uses the 6 pin power connector.
- Repeat this process with any other cards you might have.
- I suggest powering up the PC again just to make sure the graphics card works and is installed correctly.
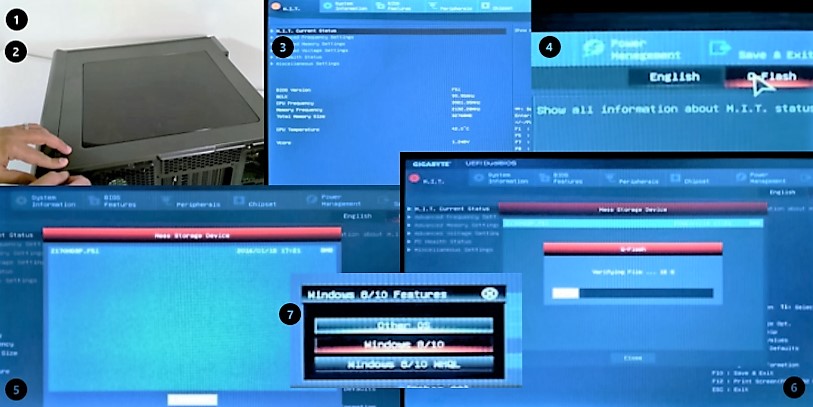
Step 9: Put the case back together and configure the BIOS
- That’s all the components fitted, well done! Stand the PC up and slide the back and front covers of the case back into place.
- Hand tighten the case screws back on and connect the monitor and peripherals ready to configure the BIOS.
- All motherboards will have their own configurations and you will need to consult your motherboards manual for all the options available. I’ll use my build as an example of some of the settings I configured for my setup. First let’s update the BIOS – always a good idea especially for newer motherboards.
- My Gigabyte motherboard has a Q-Flash utility to do this. I downloaded the latest BIOS from the manufacturer’s site, copied the unzipped file to a fat32 formatted USB drive and plugged it into the PC.
- I powered on the PC and went into the Q-Flash menu and selected the USB drive and then the BIOS file.
- The BIOS then updated to the newest version.
- I will be installing Windows 10 and so enabled the correct options as per my motherboards manual.
Step 10: Setup up RAID on your drives
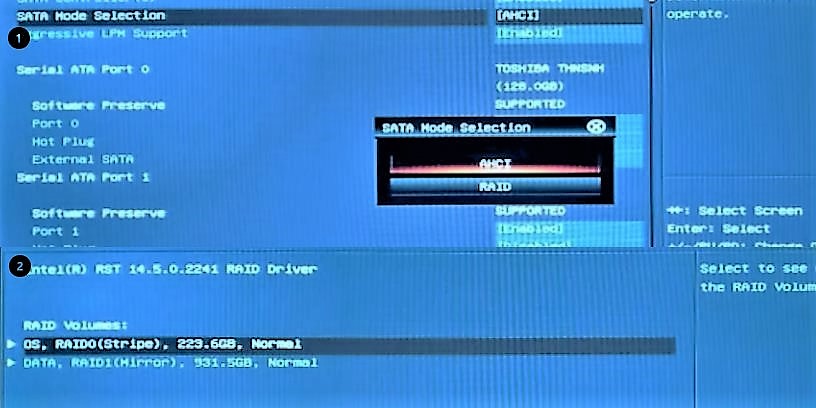
- I enabled RAID by changing the SATA Mode Selection from AHCI to RAID and after a reboot the Intel Rapid Storage Technology option appeared.
- This option allowed me to combine the 2 SSD’s using RAID 0 for the OS, which will make Windows 10 treat the 2 SSD’s as one drive. I also used RAID 1 on the 2 SATA storage drives using the Create RAID Volume option. This mirror RAID is my backup so that if one drive fails, the other will always be an exact copy.
Step 11: Install the Operating System (OS)
- If you’ve get a Windows 7/8 installation disk that you plan to install and upgrade to Windows 10, I recommend installing Windows 7/8 first, activating the license and then doing a clean install of Windows 10. Windows 10 will automatically activate with your Windows 7/8 license.
- You can create a Windows 10 USB bootable drive by following the official Microsoft instructions. In a nutshell you download the media creation tool and follow the on screen instructions – it’s as easy as that.
- Plug in your Windows 10 USB drive and hit the F key for booting from your USB (usually F12 but varies from motherboard to motherboard).
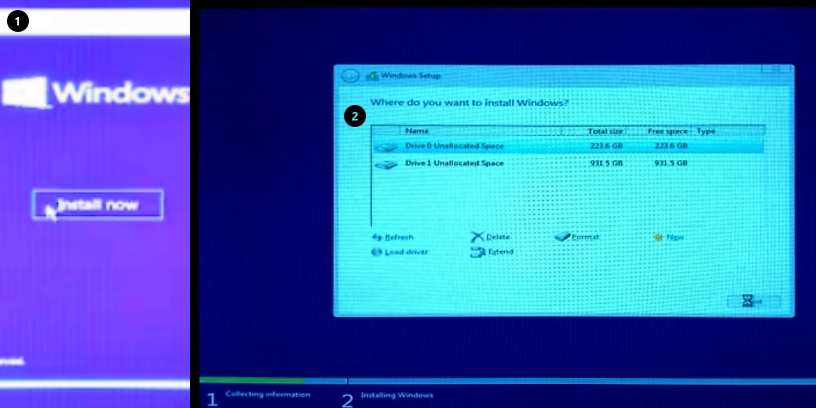
- After start up, you’ll get the regional settings menu, click next. Click on Install now and accept the license agreement.
- Choose the Custom: Install Windows only (advanced) option and pick the hard drive you want to install Windows on and hit next. You can take a break now as the installation will take some time.
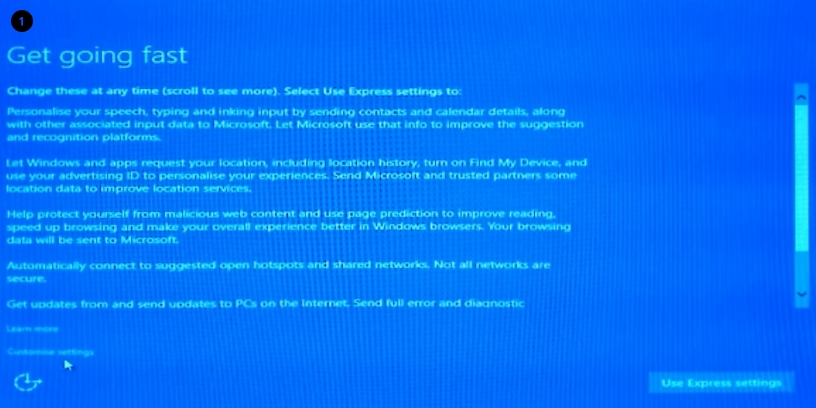
- After an automatic restart or two, you will be presented with the Get going fast screen. I like to customize my settings so that I can turn on/off features to my liking. If you’re not fussed, click on the Use Express settings button.
- Decide who owns your PC on the next screen and decide if you want to use an online Microsoft account to sign in. I prefer to use a local account and chose the Skip this step.
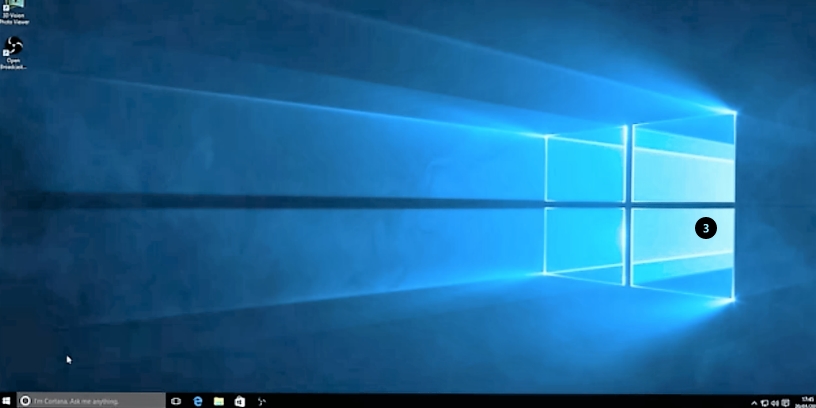
- Create your account to login to the PC, click next and after some loading screens you’ll be logged into your desktop – if this is the first time you’re doing a Windows install, well done!
- Let your computer sit like this for a little while because in the background Windows will be downloading updates and drivers for your hardware. You may also need to reboot a couple of times when prompted.
- If you configured RAID verify that the disks are showing correctly in device manager.
- On my build Windows managed to find all the drivers for my hardware – not bad! Sometimes Windows installs some generic drivers that don’t support the hardware’s full functionality so I normally download the latest drivers as well from the manufacturer’s website.
- That’s it! The PC is built and ready to be used. I have been using this build for a couple of months and am very happy with its performance.