Install Ubuntu on the Toshiba Chromebook 2 in 5 Steps
For users who want more than Chrome OS, there is the option to install a more complete OS that gets rid of most of the limitations of Chrome OS.
The idea of installing Linux is nothing new but the problem up till now was this particular model. More specifically, any Chromebooks with Bay Trail processors did not have the option to boot from a USB drive.
Fortunately a hero amongst the Chromebook/Linux community has been diligently toiling away finding solutions to this problem. The BIOS used in Chromebooks is open source and by tinkering and tweaking, this hero has been able to create a modified version of the BIOS that can be flashed to your Chromebook.
Once this modified version of the BIOS is installed, a normal Linux bootable USB drive can be used to wipe the Chromebook’s hard drive and install Linux.
Before we begin, you should know that this process is reversible in that you can easily revert back to Chrome OS anytime.
Who is this hero you speak of, I hear you ask. A freelance linux system admin by the name of John Lewis, see his post on the Bay Trail release.
Thanks John for all your efforts and of course to the cyber community that have been testing and adding their thoughts. This guide is based on the info from there.
Update:
Whether you’re using a Baytrail Chromebook or newer Chromebook, John has created RW_LEGACY BIOS mods that means you don’t need to open up your Chromebook any more. This is a safer option that doesn’t invalidate your warranty and can’t brick your Chromebook. See my full guide on how to dual boot Linux and Chrome OS.
What you’ll need:
- Toshiba Chromebook 2 (HD or Standard)
- Small Philips screwdriver
- Small Flat screwdriver
- Flat tool to pry back cover off (I used a nail file)
- 2 GB USB drive or larger with live Ubuntu install
Step 1: Backup any data you may have on your Chromebook
I had been using my Chromebook for a while so I made sure I backed up any files that I hadn’t saved on my Google drive.
- If yours is a brand new Chromebook, check to see if you are eligible for free storage, claim that first by going through the Chrome OS set-up (I got 100 GB free for 2 years with my Chromebook).
- After following this guide, if you decide you want to go back to Chrome OS, you can use option 3 from John’s script to revert back. Just run it in your Linux terminal. You will also need to create a Chrome OS recovery USB drive, see here.
Step 2: Enable developer mode
- This will wipe your Chromebook and allow full access to your Chromebook system files.
- With your Chromebook turned off hold down the ESC and Refresh button and press the power button once.
- This will take you into recovery mode. Press Ctrl+D to bypass this message.
- Press Enter at the next screen.
- On the next screen press Ctrl+D to bypass this message.
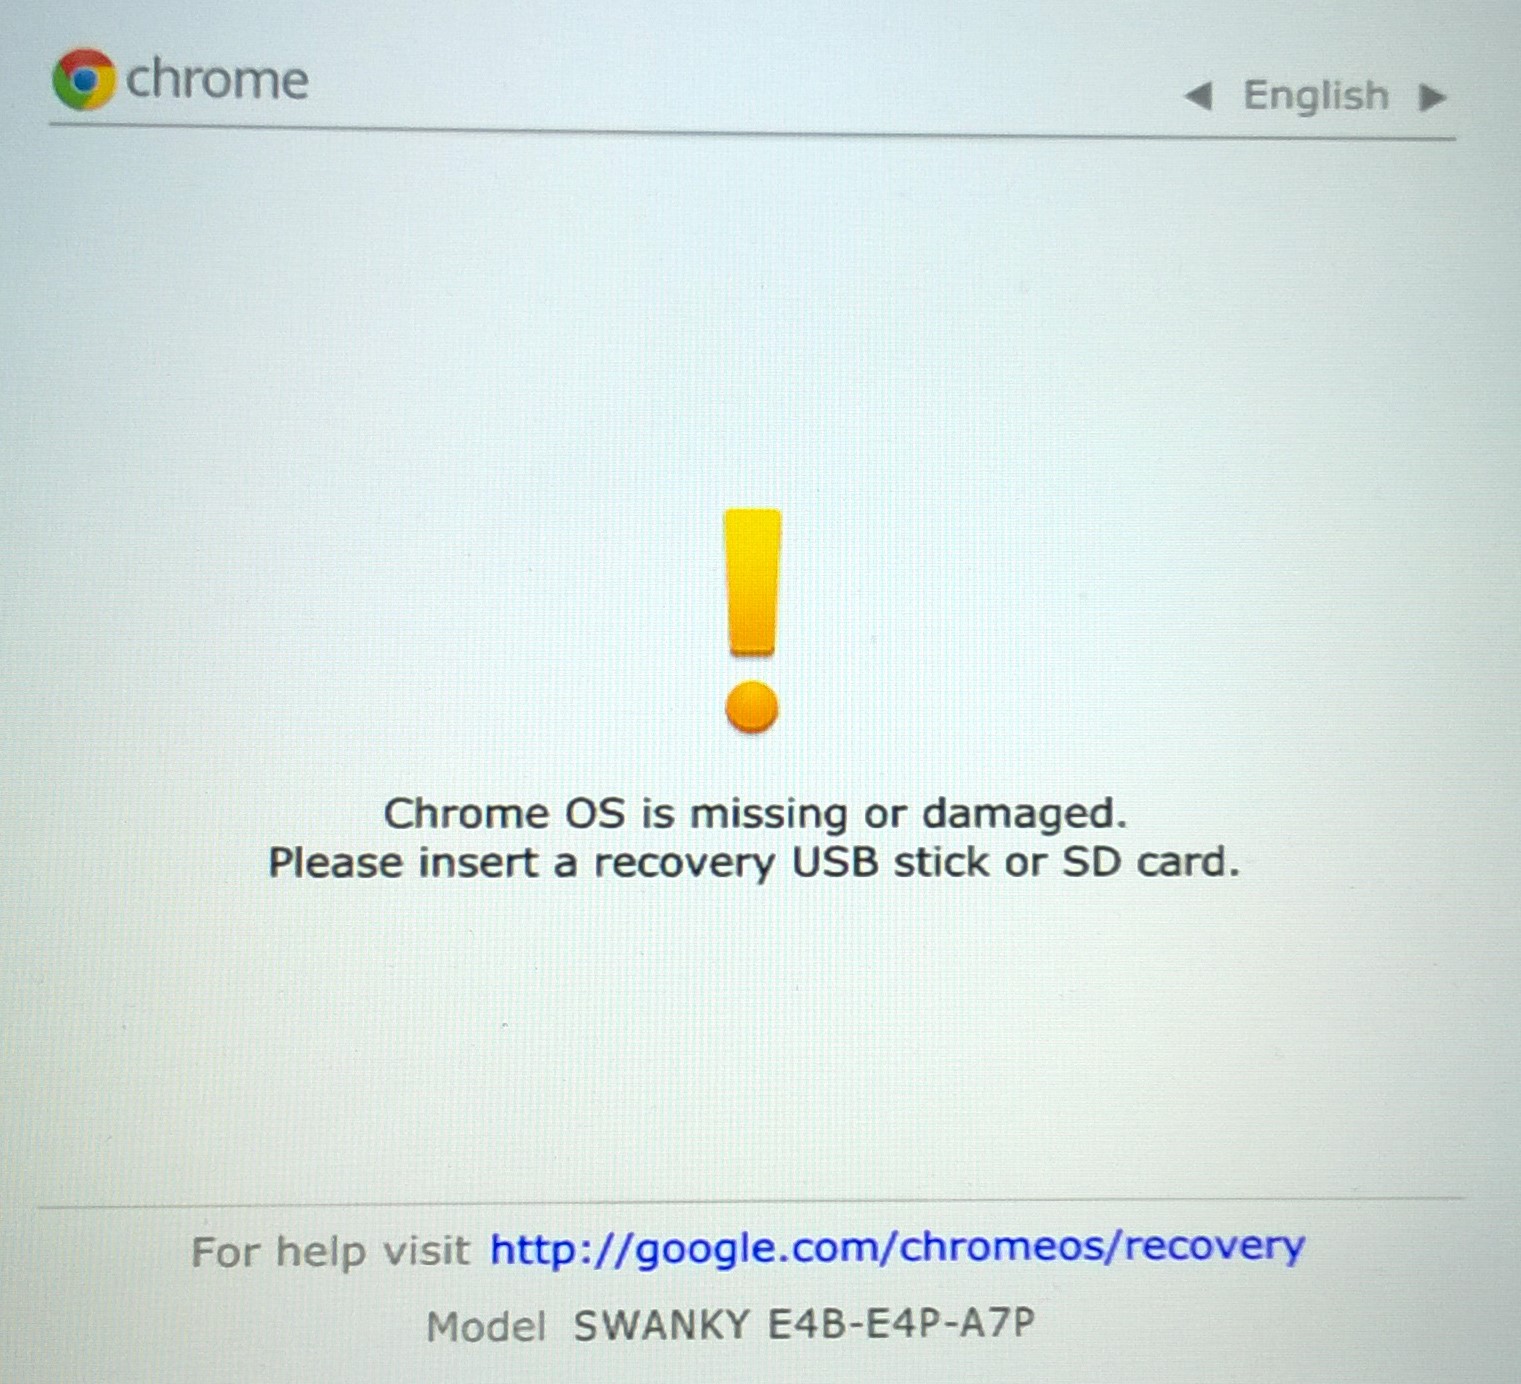
- Now wait and wait some more. Eventually the Chromebook will reboot you’ll see the screen with the red exclamation mark.
- Developer mode is now enabled, power off the Chromebook.
Remove the back cover and disable write-protect
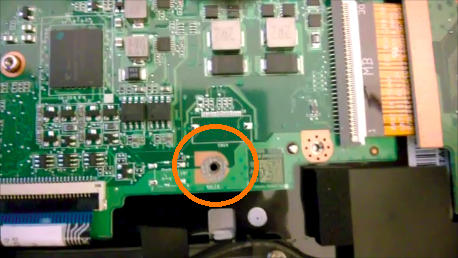
- By default write-protect is enabled which means the installed BIOS on the Chromebook can’t be modified. On the Toshiba Chromebook 2 the write-protect is a little round sticker on the motherboard. To remove this you will need to remove the back cover. With a little care and patience you should be able to do it quite easily without scratching the casing.
- When you open your Chromebook you want to avoid static electricity so don’t do this on an unsuitable surface like a carpet!
- Remove the 8 screws on the back cover.
- Take out the 2 rubber feet on the trackpad end of the Chromebook using a flat screwdriver and remove the 2 screws.
- On the hinge end use your flat tool to lift the back cover carefully.
- On lifting some more you should find the cover comes off quite easily.
- Remove the 6 screws and carefully lift the metal shield off the motherboard.
- Use your flat screwdriver to delicately remove the round sticker.
- Underneath you will see two pads with a line running through them. By removing the sticker the two pads are not connected anymore and write protect is disabled.
- Before putting the metal shield back on, cover the bit that touches the two pads with some tape.
- I used the extra bit of tape on one of the cables to prevent the metal shield from touching the write-protect area. You could use electrical tape if you want to.
- Refit the metal shield back in place leaving out the screw that went into the write-protect hole.
- Put the cover back on by pressing on the edges starting from the trackpad end.
- Screw all 10 screws back in and re-attach the two rubber feet. The glue should be strong enough otherwise use some double sided tape.
4. Install the modified BIOS
To make things easy on us John has created an all-in-one script that covers over 25 different models of Chromebooks. I told you he’d been busy!
- Power the Chromebook on and press Ctrl+D to bypass the red exclamation mark screen.
- Go through the Chrome OS setup.
- You should now be on the normal Chrome OS desktop screen.
- Open a new Chrome tab and go to John’s website
- At the bottom of the post (before the comments section) copy the commands.
- Press Ctrl+Alt+T to bring up a terminal window tab.
- Type shell and press Enter
- Paste the commands into the terminal and press Enter (These commands remove any older versions of the script, download the latest version of the modified BIOS and flash the Chromebook with that version).
- Choose the option to Modify my Chromebook’s BOOT_STUB slot and follow the on-screen instructions.
- When you restart you will see a black screen indicating the new BIOS version.
5. Boot into your live USB drive and install Ubuntu
The last step is the easy part, turn off your Chromebook and insert a live Ubuntu USB thumb drive into the USB port.
- Turn the Chromebook on and press ESC
- Press the number that indicates your thumb drive (should be option 1).
- You will see the Ubuntu setup screen – setup Ubuntu in the normal way.
- Unless you have a specific way you want to partition the internal hard drive (it’s actually a eMMC card), I recommend you use the default option to wipe the whole drive.
- Once installed, reboot and everything should work out of the box.
- Well, maybe not everything. Please use my script to fix sound and remap keyboard keys automatically.
-
There’s one thing that needs further attention, the sound doesn’t work, but it’s easy to fix Getting sound to work on older versions of Ubuntu requires an extra step. Download the modified sound config file (asound.state) from hereOpen up a terminal window and type sudo alsa force-unload to kill the audio services.Replace the system’s sound config file with the downloaded version:Type sudo cp ~/Downloads/asound.state /var/lib/alsa- Reboot your Chromebook and guess what? The sound works.
- UPDATE: In an effort to automate these fixes, I have written a script to automatically apply sound fixes and keyboard tweaks for you. See my post on automating Chromebook fixes.
Links
That’s it, you’re done! My advice, give it a go, you can always revert back to Chrome OS if you change your mind. You’ll end up with a fully functioning ultrabook for about less than a third of the price – not bad huh?