How do I create a bootable Live Linux drive?
In this post I’ll show you how to create a Linux USB drive or DVD disc so that you can boot your computer, laptop or Chromebook into Linux.
This post is primarily for new users to Linux but will also help computer support technicians in general to create a tool to use to repair or backup data on problem computers. In fact this was how I first started using Linux at work and home many years ago.
The process is quite simple, first you choose a Linux version to download and then you burn it to a DVD or unpack it to a USB drive. Simply copying the download to a disc or USB will NOT work. Lastly you boot your computer from that disc or drive to launch Linux.
Some of you may be smirking at the use of a DVD disc instead of a USB. Who uses DVD’s any more and most computers and laptops don’t even have a DVD drive anymore, right?Of course dear reader you are right in part but a DVD is the easiest way for newbies to get started. You can also use it to repair lots of things should your USB drive have a problem or your computer be incapable of booting from a USB. We still use external USB DVD drives for example at work from time to time…
Choose a Linux version (also known as distribution or distro) and download it
There are so many distros out there that it’s hard to know where to start. Each distro aims to serve a niche or function for it’s user base.
Lots of distros say they are designed for first time Linux users but I’m going to narrow down my recommendation to Ubuntu, elementary OS and Linux Mint. These distros are very popular and have large communities that provide support.
You will need to download Linux which is provided in an .iso format. This is a special image file type that includes all the files and folders needed to start and install Linux. These files are typically a minimum of 1GB so you need a fairly decent internet connection. Use one of the links to download the iso:
Create the disc or USB drive
- Option 1: Burn the Linux download to a DVD
- Option 2: Unpack the Linux download to a USB drive in Windows
- Option 3: Unpack the Linux download to a USB drive in Linux
Option 1: Burn the Linux download to a DVD in Windows
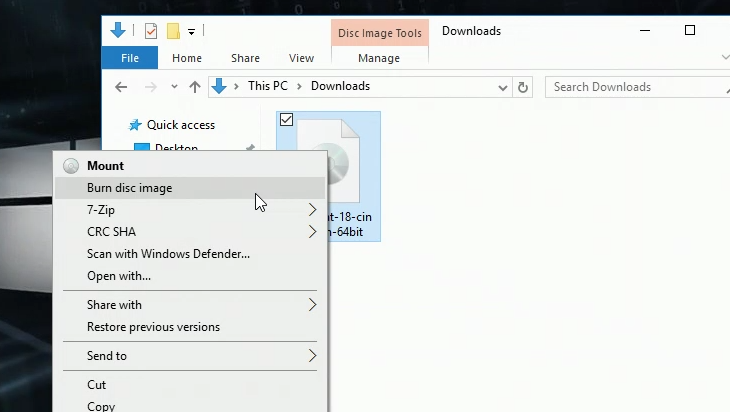
This is super simple to do:
- Go to the iso file you downloaded and right click on it to choose the burn to disc
- Insert an empty writable DVD disc into your DVD-RW drive.
- Click burn to unpack the iso onto the DVD.
- The disc will take a couple of minutes to complete.
Option 2: Unpack the Linux download to a USB drive in Windows
You need a USB drive that has a minimum of 2GB drive space and one you don’t mind wiping completely. If you’ve got one lying around great, but if you’re going to buy one here’s some tips.
USB 2.0 drives are cheaper (you don’t need the speed of USB 3.0 for this), avoid ones with bundled encryption software and finally if you choose a 8GB drive for example, check the 16GB version, sometimes there’s only a dollar or two price difference (here’s the one I’ve been using SanDisk Cruzer Blade).
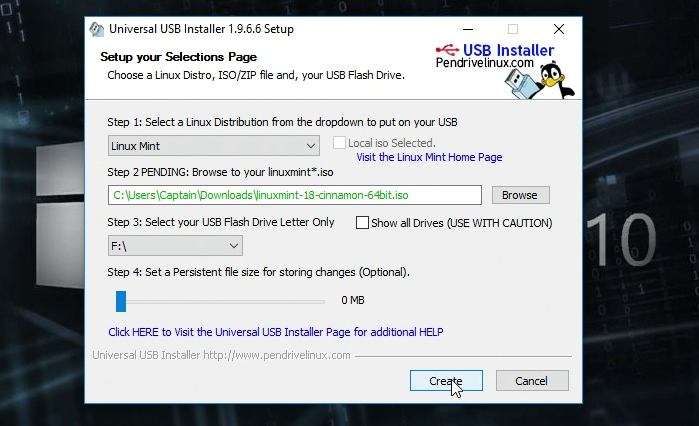
To create your bootable USB drive you’ll need a utility to unpack the iso onto your drive. I used the Universal USB Installer (UUI) but there are others as well like the LinuxLive USB Creator and Rufus.
- Plug in your USB drive.
- Download UUI and run the program.
- From the dropdown menu choose the name of the Linux distro you downloaded earlier.
- Click the browse button and locate the iso file download.
- Choose the drive letter of your USB drive (remember, this will wipe anything on the drive).
- Click the create button and in about 5 minutes your USB will be ready.
Option 3: Unpack the Linux download to a USB drive in Linux
Many of you may be thinking, hold on a sec, why would I want to do this? Well I’ve included this option for those of you who know someone who runs Linux whether that’s a friend, relative or roommate. You can use this quick option to create your bootable USB from their computer.
It’s also an option if you’re running Linux and want to try a different distro.
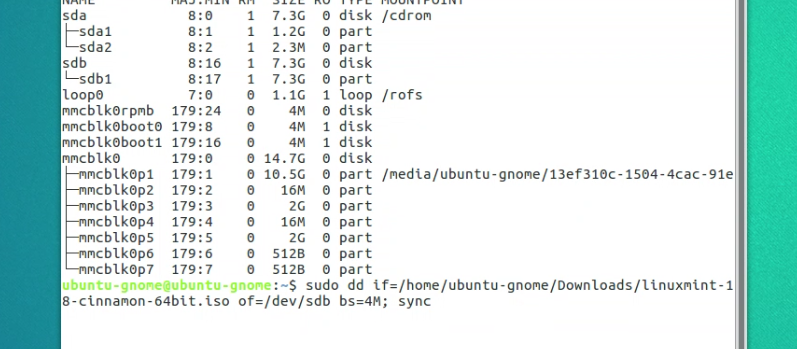
We’ll be using the dd command which should be used carefully to avoid overwriting the wrong drive. To limit the chance of any mistakes, we’ll check all the drives first without plugging in the USB drive. Then we’ll plug it in so that it’s easily identifiable.
- Open a terminal window and run the lsblk command, this will show all the drives on your computer.
- Now plug in your USB drive and run lsblk again. By comparing the two lists of drives it’s easy to see the new one in the second list. In Linux most hard drives and USB drives use the names sda, sdb, sdc… This is the identifier that we’ll need for the dd command.
- Now use the dd command which needs to know where the iso file is and the name of the USB drive.
sudo dd if=/path to iso file of=/dev/sdX bs=4M; sync
- Double check the drive name is correct and press Enter.
- It might look like nothing is happening but be patient, after about 5 minutes the command will finish.
Use your DVD or USB to boot into Linux
We now have our tool to install Linux, all that’s left is to boot into Linux from your computer.
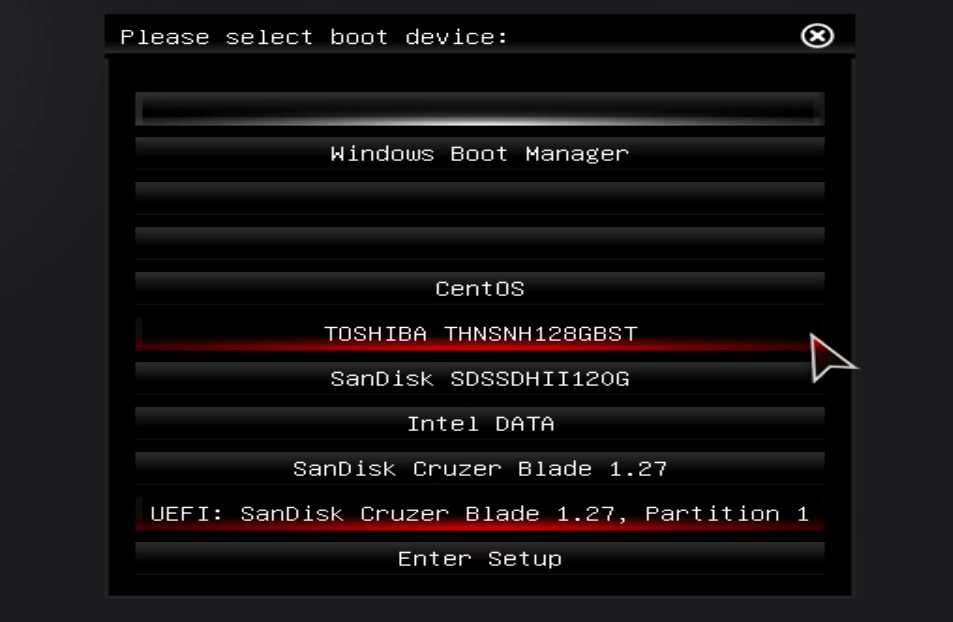
- With your computer turned off, plug in your USB drive or insert your DVD disc.
- Turn on your computer and start pressing the F12 key over and over to take you to the boot menu (this tells your computer to start from your USB or DVD and not the hard drive). On other computers you may need to use the F9, or delete key instead.
- Choose your USB drive from the menu, if you see an option with UEFI in it, choose that option.
- Your computer will now boot into the Linux desktop. Well done, you made it!
The great thing about Linux is that the bootable drive is non destructive. In other words using this drive will not change or alter your computer in any way. You can spend time trying out Linux as a Live install and when you’re finished, shutdown the computer, unplug the USB drive and your computer will be unaffected.
If you absolutely hated Linux, fair enough but if you liked it, I think at some point, you’ll end up installing it permanently.